...a place to illuminate one's creative potential.

Tuesday, December 31, 2013

New "True" colors necklace!

I fell in love with this necklace at a great shop in Asheville, NC.  I could not bring myself to pay the $89 price tag.  I rushed home, went to Walmart and bought all the supplies I needed to make my own for less than $10!  I will be wearing my "True" colors for New Years Day!
Original necklace at the store: $89

My version: < $10

Get a variety of hair bands.

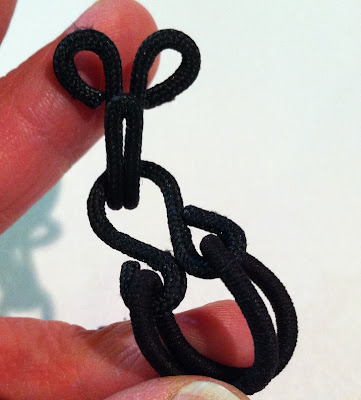
This was a covered hook and loop from the sewing isle.
Open sides with pliers and attached the first band.

Continue to loop hair bands in a chain fashion.

When you get about a third of the length down,
 start adding colored hair bands to each side of each new hair band you put in.
I added three to each side, a small, medium, and large. 

Keep adding to the chain until you have the 2nd third finished.

Finish the last third off with loops of hair bands. 

Put the other end of hook and loop closure onto the last hair band.


Sunday, December 29, 2013

Apple and Pear Complete!


This pieces are 24 X 24 on plywood art canvas.  All papers used in the paper painting were Gelli printed science worksheets from the recycle bin in my classroom.  I thought you might enjoy seeing the start to finish images!


Saturday, December 28, 2013

2014 Art Journal Cover

Jan. 1st needs to hurry up!  I am ready to start using my prepped art journal/planner! Stayed up till 2:15 am to finish the cover.  I also decided on my word for the year...True.  I am participating in the Documented Life Project.


Layers:
Moleskin soft cover planner
Gesso
Green paint
Stenciled in greens and blue
Torn and cut gelli printed papers applied with matte medium
Face painted, detailed with Pitt pen
Smudged charcoal outlines
Writing and white accents with Sharpie Acrylic pens
(Still need to do a sealer coat)

Thursday, December 26, 2013

Playing with my Christmas presents...

I got Gelatos and I am loving them!  They are like painting with lipstick!  I will be using the stencils with my Gelli plate.  That black brush is a splatter painting brush.

Playing with Gelatos on top of Gelli printed paper.

Gelatos on white paper with lots of washi tape!  Trying to find my "word" for this year.

Monday, December 23, 2013

Pear Progress


Tonight: Added torn bits of Gelli printed papers to pear half.

Last night: Underpainting of pear.

Sunday, December 22, 2013

Under painting

I am getting started on a fruit companion set.  This is the under paintings.  It is always good to work on companion pieces at the same time so that your colors work out with each other.  I also had to do some Gelli printing for the papers I will be using over the under paintings.


Saturday, December 21, 2013

Bag #2

Harbor Freight all over the country must be scratching their heads wondering why these little rigger bags are selling faster than they can keep them in stock!  This is bag #2 that I have decorated.  I have a third!  Will I keep them or give them to friends? 


 These are not highly detailed paintings. Loosely painted and scribbled with Sharpie.

Tuesday, December 17, 2013

Candles

The paper that the candles were torn from was the blotter paper from my studio table top.  It had all the paint that I had rolled off of my brayer while doing gelli prints last night as well as bits of washi tape left over from putting inserts into my journal.  I glued them into my art journal.  What we think is trash, can be used in creative ways!

Monday, December 16, 2013

2014 Art Journal prep


I put in a tag for each month that I stamped as the happiness card.
There is a sheet of watercolor paper each month added
in as a fold out insert with washi tape.
This page is called "card peeks". You do a mini watercolor painting
each week of the month.

There are two inserts of jelly printed card stock for each month.
These are just background starters for anything I choose to do.

I am leaving the weekly calendar part to actually use as a planner.  Or maybe to document the weather, mood, or inspirational quotes for the day.

I can used the ruled side of the planner each week like a diary.
And the back of the inserted gelli printed paper for sketching, magazine collages, etc.

Here it is with all the washi tape showing from the inserts I put in.


I love that gelli printed insert I put in!

And this one!

My happiness cards double as monthly divider tabs.

You can see my envelope insert with downloads from
the No Excuse Journaling course added here.

I need to add a few more dividers. Ran out of tags!


And it is in my journaling bag ready to travel wherever I decide to play!

I have found two different art journal inspirations using a moleskin extra large planner.  The first one is Gina Rossi Armfield's method "No Excuses Journal"(here) and the other is "My Documented Life Project"(here) by a group of 4 women who are each posting this project on their individual blogs.  I am combining parts from each and a few of my own ideas. Can't wait for Jan 1st to get here!  Meanwhile, I will keep working in my mini December planner.